
Picture a warm summer night, laughter echoing, and bowls of creamy, homemade ice cream—bursting with ripe peach, berry, or rich chocolate flavors—that taste like pure nostalgia. This allergy-friendly “nice” cream recipe is your ticket to old-fashioned joy: a velvety custard base made without gluten, dairy, or refined sugar, easy to adapt for your favorite fruits and flavors. Ready to wow your taste buds and bring the family together? Let’s dive in!
A Sweet Family Tradition with a Twist
Homemade ice cream was the soul of our family gatherings. I can still see the grown-ups cranking the old-fashioned churn while we kids begged for a turn—only to learn it was no job for little arms. Electric ice cream makers later eased the effort. However, Grandma’s batches reigned supreme, thanks to her rich, adaptable custard base that can be transformed into any flavor.
Mom kept the tradition alive, churning out Grandma’s recipe for birthdays and special occasions. Her favorite flavor was banana, Dad’s was peach, and I eventually crafted my signature crème de menthe with mini chocolate chips.
When food sensitivities hit—no gluten, cow dairy, or refined sugar—I thought those creamy days were gone. But I couldn’t let tradition fade. With tapioca starch, coconut milk, and honey, I created a homemade nice cream so silky and delicious, you’d never guess it’s allergy-friendly. Recently, my husband told his dad he’s still amazed how I swap healthier ingredients and make recipes work.
This recipe preserves Grandma’s custard tradition with wholesome, gut-friendly ingredients, offering indulgence without compromise.

Homemade Ice Cream Swaps for a Healthier Scoop
This isn’t just any homemade ice cream. It’s a reimagined version that keeps all the creamy, old-fashioned flavor with the following ingredients:

-
- Duck eggs (or chicken eggs) – richer yolks create a naturally velvety custard.
- Full-fat coconut milk (or plain cashew or macadamia milk) – ultra-creaminess without dairy*
- Honey – natural sweetness without refined sugar
- Tapioca starch – thickens without gluten, keeping the base silky
- Collagen peptides – an optional stir-in for a subtle protein boost
- Fresh fruit – choose peaches, berries, mango, or your favorite seasonal fruit
*Tip: A large 96- or 101-ounce can of coconut milk (available at restaurant supply stores or on Amazon) provides enough for this recipe with about 4 cups leftover. You can refrigerate or freeze the extra for later use. Additionally, buying a large can costs less than several smaller cans.
While this homemade ice cream is not a “health food” or something to be consumed regularly, it aligns with God wanting us to eat, drink, and be merry (Ecclesiastes 8:15). With thoughtful swaps like these, we can enjoy an occasional indulgence while still honoring our temples.
Why Homemade Ice Cream Refreezes So Hard
Homemade ice cream doesn’t contain the stabilizers and emulsifiers that commercial brands rely on—like gums (guar, xanthan) and mono- and diglycerides, often derived from seed oils. These additives keep store-bought ice cream soft and scoopable straight from the freezer, even after days of storage.
While they create that creamy texture, gums and industrial emulsifiers can cause digestive discomfort for sensitive people. Mono- and diglycerides are also a hidden source of inflammatory, processed seed oils (See my AIRD post on The Dangers of Seed Oils and Trans Fats for details).
The trade-off? A cleaner, more gut-friendly dessert. However, your homemade ice cream will freeze harder. Therefore, let it rest at room temperature for 10 to 15 minutes before scooping for the perfect texture, and enjoy that true, old-fashioned flavor!
How to Make Homemade Ice Cream (the simple version)
Making ice cream custard sounds complicated, but here’s the quick overview:
- Thicken coconut milk with tapioca starch over medium heat.
- Temper in the eggs carefully to avoid scrambling.
- Chill the custard thoroughly.
- Stir in fruit puree or mix-ins.
- Pour into your ice cream maker and start churning.

What You’ll Need to Freeze Your Homemade Ice Cream
Electric ice cream makers have made making homemade ice cream easy and fun—ideal for beginners. Once you’ve got the custard made, here’s what I recommend:

- Ice cream maker: An electric machine (like this one.) makes the process simple, but you can also use a hand-crank (like this one) if you love the old-fashioned experience. This custard-based recipe requires churning in an ice cream maker to achieve its creamy texture.
- Ice and rock salt: If you’re using a traditional maker with a salt-and-ice bucket, rock salt is essential. It lowers the freezing point of the ice so your mixture firms up quickly and evenly (you can find rock salt here).
- Storage container: A freezer-safe container with a lid preserves your homemade ice cream’s freshness and texture.
- Ice cream scoop: Optional but makes serving neat, perfectly portioned scoops a breeze.
- Beach towel or blanket: Wrapping the ice-packed ice cream maker with a towel or blanket after churning helps keep it cold during the curing stage, which allows the ice cream to firm up evenly and develop a smooth, creamy texture.
That’s it! With just a little stirring and a touch of patience, you’ll be rewarded with the creamiest homemade ice cream. Enjoy fresh soft-serve or freeze for a firmer scoop.
Your Blank Canvas Custard Base
This custard base is versatile and flexible. Peaches are a star in the recipe below, but you can swap in almost any fruit or mix-in. Plus, you can replace coconut milk with cashew or macadamia milk for a slightly less creamy yet fabulous twist.

Endless Flavor Variations
Try the following instead of peaches to create your own family favorite:

-
- Banana Dream: 2 cups mashed bananas + 1 teaspoon cinnamon
- Berry Bliss: 2 cups mashed raspberries or strawberries (or a mix)
- Mint Chip (Adults only due to the liqueur): 1/3 cup crème de menthe + 1/2 bag mini chocolate chips
- Tropical Twist: 2 cups mango + 1/2 cup shredded coconut (with macadamia nut milk)
- Tutti-Fruity: 2/3 cup each: mashed banana, strawberries, raspberries + the juice of 1 orange
- Double Chocolate: 1/2 cup unsweetened cacao or cocoa powder + 1/2 cup mini chocolate chips
Once you master the custard base, the sky’s the limit.
Time to Churn Up Some Fun
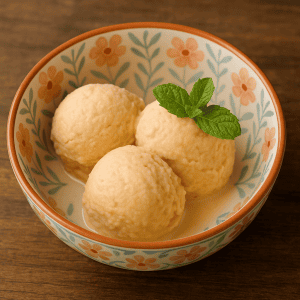
Ready to make a batch of the creamiest homemade peach ice cream? This allergy-friendly nice cream recipe is just the ticket—full of bright peach flavor and none of the dairy.
Whether you stick with the classic peach featured in the following recipe or get creative with other flavors, homemade ice cream is a celebration of family, flavor, and joy. Whip up a batch this week and share your favorite combo below in the comments!
Homemade Peach Ice Cream Recipe (Dairy-Free, Gluten-Free, Allergy-Friendly)
Equipment
Ingredients
- 3 duck eggs, (or 4 chicken eggs)
- 8 cups full-fat coconut milk, divided (or other non-dairy milk; more or less depending on your ice cream maker capacity)
- 1/3 cup tapioca starch
- 1 cup honey
- 1/4 cup collagen peptides, (optional)
- Pinch of salt
- 1 teaspoon pure vanilla extract
- 2 cups mashed peaches, leaving some small lumps (2 to 3 large, ripe peaches)
Instructions
- In a small bowl or cup, combine the tapioca starch with a few tablespoons of coconut milk; whisk until smooth. Set aside.
- In a medium bowl, beat the eggs well and set aside.
- In a saucepan over medium heat, warm 4 cups of coconut milk.
- Whisk in the honey, collagen, and salt until completely dissolved.
- Slowly whisk in the dissolved tapioca starch, stirring constantly until slightly thickened.
- Temper the eggs by slowly pouring about 1/2 cup of the hot milk mixture into the eggs while whisking quickly; then slowly pour the tempered eggs into the saucepan, while whisking.
- Continue cooking, stirring constantly, until the mixture thickens enough to coat the back of a spoon but do not let it boil to avoid curdling. Stir in the vanilla.
- Remove from heat. Let cool slightly.
- Cover and chill completely in the refrigerator for several hours or overnight to improve texture and flavor.
- When you’re ready to make the ice cream, combine the custard and peaches in the ice cream maker’s container. Then, add additional coconut milk, if needed, up to the fill line.
- Insert the paddle and churn according to the manufacturer’s instructions. When it’s finished, remove the paddle from the ice cream.
- At this point, the ice cream will be scoopable but quite soft. For a firmer texture, pack ice around and on top of the container. Then, cover it with towels for insulation, and allow it to ‘cure’ in a shady spot for about an hour before serving. This helps the ice cream firm up and the flavors to meld beautifully.